Categories
Care & Raising Tips-FAQ
INDEX FOR "CARE & RAISING TIPS" PAGE (click on link to take you to that section):
SILKWORM EGG/SILKWORM FAQ
Silkworm /Hornworm) Chow cooking instructions (using microwave)
Silkworm/Hornworm) Chow cooking instructions (on stovetop)
Hatching and raising Silkworms from eggs
Proper heating method--petri dish containing small silkworms (incubator information)
Small and medium silkworm care sheets
Goliath Hornworm care sheet
Hatching Goliath Hornworm eggs
IMPORTANT - IMPORTANT - IMPORTANT!!
[SILKWORM EGG/SILKWORM FAQ]
Newly hatched silkworms must be maintained at warm temperatures (78-85 degrees) or they will not grow and will usually die. We recommend incubators (see below for more details on incubators and keeping them warm). Once the silkworms reach about 3/4 inch long (after about 10 to 12 days from the time they hatch) they are past the critical stage and can be rasied at somewhat lower temperatures - but it is best to keep them warm thru all stages if you want them to grow quickly and remain healthy.
How long after I receive my order of silkworm eggs will they hatch?
The silkworm eggs will generally hatch within a week after they arrive if kept between 78 and 85 degrees, but may take up to 2 weeks (eggs take longer to hatch at cooler temperatures).
What do I need to do to hatch the eggs?
Try to keep them consistently between 78 and 85 degrees. They will hatch at a somewhat lower temperature but it will take longer (and the newly hatched worms will not grow and be healthy unless they are maintained at warm temperatures). WE RECOMMEND USING AN INCUBATOR IF POSSIBLE. (See picture and info below.)
Are the eggs guaranteed to hatch?
Yes, if cared for properly. The hatch rate is usually about 90-95% (or higher), but do not be alarmed if you end up with significantly fewer worms than eggs because some of the worms get covered up by a thin invisible layer of silk that silkworms are constantly placing down. Also it is normal for some worms to die at the earliest stage after hatching (especially if they are overcrowded or environment is not ideal). If you want to maximize the number of worms you get from a given number of eggs, no more than 500 eggs should be hatched out in each petri dish (200 eggs per petri dish is ideal for maximum number of worms to eggs hatched). If you place about 200 eggs in each LARGE petri dish for hatching, you will end up with a higher percentage of worms to eggs than with a higher number of eggs per dish -- as long as temperatures remain warm and other environmental/feeding needs are met.
Silkworm eggs purchased in lots of 200, 500 and 1,000 no longer come glued down; they now come loose in a smaller petri with a large petri for hatching. When you receive your eggs place them in the middle of the large petri dish for hatching (if static electricity causes your eggs to stick to the petri dish rub the bottom of the petri dish with a dryer sheet to disperse the static electricity/release the eggs).
Silkworm eggs purchased in "bulk" lots will come loose in a petri dish and do not include larger petri dishes for hatching. When ordering "bulk" eggs be sure and order our LARGE petri dishes for hatching out your eggs if you do not already have them!
Can the eggs be refrigerated to delay hatching?
Silkworm eggs should not be refrigerated UNLESS they are shipped using Overnight delivery with an ice pack and styrofoam box (purchased separately). Upon arrival the eggs should be placed immediately into your refrigerator and maintained between 35 to 37 degrees Fahrenheit (with 70 to 80% humidity). Then they can be stored in your refrigerator for over 1 month and they will hatch about 8 to 10 days after removal (if maintained at around 80 degrees).
Why there does not appear to be as many silkworm eggs in the petri dish as indicated on the petri dish?
We have checked, double and triple checked our method of dispensing silkworm eggs into the petri dishes and there is always more eggs in the petri dish than what the customer ordered (even though there may not appear to be as many as there actually are). Try counting them, then you will be convinced (we have)! See picture of 1000 eggs below.
What do silkworms eat?
Silkworms only eat mulberry leaves and/or artificial silkworm diet (Silkworm Chow). If you are going to feed the newly hatched silkworms mulberry leaves instead of Silkworm Chow be sure and only feed them the new growth (tiny 1/2 to 1 inch leaves) or they will not be able to eat them because their jaws are too weak. Place only one tiny new leaf in the petri dish until it is completely eaten. Then repeat at least once a day until they are large enough to eat the larger leaves. Once they taste mulberry leaves it is difficult to get them to eat Silkworm Chow. Some customers that have mulberry trees raise them on Silkworm Chow until the worms are large enough to eat the tougher mulberry leaves. The worms will readily switch from Silkworm Chow to mulberry. Most customers do not have a mulberry tree and therefore raise their silkworms year around on only Silkworm Chow.
Help! I'm out of silkworm food! What can I do?
Silkworms only eat mulberry leaves and/or artificial silkworm diet (Silkworm Chow). However, IN AN EMERGENCY they MAY eat carrot (wash raw, unpeeled carrots and grate for smaller silks or thinly slice or cut into thin sticks for bigger silks) for up to a few days and give you a chance to find another source of mulberry leaves or Silkworm Chow. Note that feeding carrot to your silkworms may turn them a bit orange.
What is the ideal setup and what do I need in order to raise silkworms?
The most critical period in their life is during their first week after they hatch. The most common cause of failure is due to improper temperature. We recommend using an incubator (see incubator information at bottom of this page), especially during their first week or two. (Please see information at bottom of page on how to keep your silkworm eggs/silkworms warm without using an incubator.) After about 2 weeks in an incubator - when they have outgrown the petri dish - you can then remove the worms from the peril dish and all you need is a large plastic, cardboard or glass container and a heat source to keep them warm. (As with hatching eggs it is important that the heat source should be heating the ambient air surrounding their container - NOT touching the worm container.) Continue feeding either mulberry leaves or Silkworm Chow until they reach the desired size.
Do silkworms need any substrate?
No. The remaining leftover food (after each feeding) dries and forms a substrate that the worms cling to and they will even lay down a thin layer of silk over the surface to help anchor them.
How fast do silkworms grow?
If you maintain them at about 85 degrees (and feed them all they can eat) you can raise them up to about 1 inch in 12 to 14 days. You can grow them up to 2 inches in 3 weeks and over 3 inches in just 4 weeks. They receive all their water and nutrients from the chow. Complete instructions are below.
What is the ideal temp?
78 to 85 degrees Fahrenheit
How many silkworms can I raise from 1 pound of silkworm chow?
It takes about 1 lb of prepared chow to raise up 20-25 silkworms through their entire life cycle. You can raise up to 1000 silkworms to about 1-1/2 inches long on the amount of food made from 1 pound of powdered chow (or about 100 silkworms to full size, ready to cocoon). Each pound makes 4 pounds of ready to feed Chow. Our powdered Silkworm Chow is prepackaged in 1/2 pound bags (unless ordered in bulk).
How long can the chow be stored?
The powdered chow can be stored for at least 6 months in the refrigerator and the prepared chow that you make from the powdered Chow is good fore about 1 month in the refrigerator if kept airtight.
Can I switch silkworms from chow to mulberry leaves?
Yes, they will switch eagerly to mulberry leaves. It is more difficult to switch them from mulberry leaves back to chow, but it can be done if you remove the worms from all traces of mulberry and then offer them the Silkworm Chow. They will usually start eating the Chow within 48 hours, but only if there are no mulberry leaves, stems or branches present.
How long does it take to prepare the powdered chow?
About 5 minutes in a microwave oven. Silkworm Chow can also be prepared on a stovetop but it tends to burn easier unless you stir continuously. A double boiler works better if you use your stovetop, but microwaveing is the preferred method.
Will silkworms spin cocoons?
They are easier to raise to the cocoon stage using mulberry leaves, but many customers are successful raising them to the cocoon stage on Silkworm Chow alone (as long as you keep them warm and keep the food and your hands CLEAN!!!). Cocooning can begin in as little as 28 days (from the time hatched) if they are raised at approx. 85 degree, fed regularly and maintained in a clean environment (WASH HANDS FREQUENTLY).
COOKING INSTRUCTIONS (For 1/2 lb Powdered Silkworm/Hornworm Chow)
MICROWAVE OVEN (preferred method)
CAUTION: Use at least a 1 1/2 quart microwave safe container at least 5 inches deep for each 1/2 lb. packet of Chow or it may boil-over.
1) Add 1/2 lb. of powdered Chow to 22-24 ounces (2 3/4 - 3 cups) of hot tap water and mix thoroughly by hand until all traces of powder are gone. (A wide butter knife works well for mixing.)
2) Place a sheet of plastic cling wrap over the top of the container to retain moisture.
3) Cook on high for several minutes until mixture begins to boil (it will puff up and rise to about one-third higher than its original level).
4) Turn off microwave and stir for a few seconds for uniform consistency.
5) Repeat step number 3 (for about 2 minutes), and then step 4 again.
6) Immediately place a sheet of plastic wrap inside the container and press it against the chows surface so it clings directly to the surface of the hot chow. This will prevent excessive condensation from forming and help keep the chow sterile.
7) Allow to cool and then put lid on and place into refrigerator.
8) Remove from fridge, peel back plastic wrap, slice and serve when firm.
After the Chow cools, it should have a consistency similar to soft cheese.
WARNING: Do not handle the cooked Chow unless your hands have been thoroughly washed. Silkworms are very sensitive and susceptible to bacterial problems if their food is not kept sterile. Hornworms are less sensitive.
NOTE: The cooked Chow will keep for a month or more in the refrigerator if kept airtight. The powder can be stored for about 6 months if kept in a cool dark place, or longer in a refrigerator (WE RECOMMEND REFRIGERATING)
Each 1/2 lb. of powder makes approx. 2 lbs. of cooked Chow, enough to feed/grow approx. 350 silkworm eggs into 1 1/2 to 2 inch long worms.
COOKING CHOW ON STOVE-TOP
NOTE: A double boiler will give better results than cooking directly on the stove top burner (it reduces stirring and prevents burning). We recommend using a microwave oven (see above).
1) Pour 1/2 lb. powdered Chow into a pot containing 2 3/4 cups of hot tap water.
2) Mix well by hand (it starts out thick but thins out as it gets hotter).
3) Place on stove top and bring to a boil for 5 minutes (stir continuously if you are not using a double boiler to avoid burning).
4) Stir mixture vigorously (for uniform consistency) for a few seconds immediately before pouring (for faster cooling - pour into a container to a depth of about 3 inches).
5) Immediately place a sheet of plastic wrap over the surface of the mixture and press so it clings directly to the surface of the hot chow. This will reduce condensation and will help keep the chow sterile.
6) Allow to cool and then put a lid on and place into refrigerator.
7) Peel back plastic wrap -- slice and feed when firm.
WARNING: Do not handle the cooked Chow unless your hands have been thoroughly washed. Silkworms are very sensitive and susceptible to bacterial problems if their food is not kept sterile. Hornworms are less sensitive.
NOTE: The cooked Chow will keep for a month or two in the refrigerator if kept airtight. The powder can be stored for about 6 months if kept in a cool dark place, or up to a year in a refrigerator (WE RECOMMEND REFRIGERATING) Each 1/2 lb. of powdered silkworm chow makes approx. 2 lbs. of cooked Chow, enough to feed/grow approx. 350 to 500 silkworm eggs into 1 1/2 to 2 inch long worms. Each pound of powdered chow makes 4 pounds of chow when prepared, only takes about 5 minutes in a microwave oven.
SILKWORM HATCHING AND RAISING INSTRUCTIONS (FROM EGGS)
1) HATCHING THE EGGS: For best hatching results keep eggs between 78 - 85 degrees Fahrenheit (an incubator works best). The eggs will hatch at somewhat lower "room" temperature but will take longer (and the worms will not grow very well). When the eggs arrive, leave the lid on the petri dish and place it under a large cereal bowl and place a small piece of damp paper towel (or sponge) next to petri dish to keep humidity high. Also, prop one side of the bowl up about 1/4th inch for air flow. The eggs will change from a purplish color to a light bluish/gray color a couple days before they hatch (see picture below). When eggs begin to hatch - prepare 1/2 pound bag of chow and refrigerate so it will be ready. Once they start to hatch, remove the bowl and the light will usually cause them to hatch within 24 hours. (Once they hatch, the egg shells are white and the worms are black.) If however they do not all hatch within 24 hours, it is okay to place a few tiny chunks of chow in petri dish to allow the early hatchers to feed. Try not to allow the chow to come into contact with the unhatched eggs, or the moisture in the chow can cause them not to hatch. All worms must be fed within 24 hours after hatching or they will starve.
IMPORTANT: Excessive condensation forming inside the petri dish (after placing the chow in the petri) due to cool temperatures is a leading cause of failure. The best way to avoid condensation in the petri dish (after feeding) is by using an incubator (but a warm room or heated closet also will work). The reason an incubator works so well is because it warms the air around the petri dish and not just the petri dish. When the air is warmed around the petri dish, only a light fog or mist will form in the petri dish - which is okay - but if you heat the petri dish "directly" by using a light bulb, heating pad, or other heat source, oftentimes excessive condensation will form and will drown the newly hatched worms in the petri dish. Also, if the petri is too close to the heat source the eggs or worms can become overheated and is another cause of failure. SEE INFO (AND PICTURE) BELOW ON SUGGESTIONS FOR HOW TO KEEP YOUR SILKWORM EGGS/WORMS WARM IF YOU DO NOT HAVE AN INCUBATOR.
2) FIRST FEEDING: Wash hands thoroughly before handing the cooked chow or bacteria may contaminate the food! When most the worms have hatched, open petri dish and place about 4 to 7 strips of chow (approx. the diameter of a pencil) inside the petri dish, leaving approx. a 1/2 inch gap in between each strip; replace lid (see picture below). Try to maintain AMBIENT AIR temperatures between 78 and 85 degrees. Allow worms to feed for between 5 - 7 days, depending on number of worms in dish (keep petri lid on continuously).
3) SECOND FEEDING: Feed again by placing new chow strips into the gaps next to the old chow strips and allow to feed for 3 - 5 days, while the worms grow to approx. 1 inch long. The old strips can be removed as the worms crawl on top of the new strips to feed. (NOTE: petri dish lid should remain on petri dish continuously.)
4) TRANSFER WORMS: After approx. 8 to 12 days from their first feeding (depending on the number of worms in petri dish), it is time to remove the lid from the petri dish and slide the worms out of the petri dish and into a large shallow tupperware type sweater-box or shoe box size plastic tote type container (a shallow cardboard box or dinner plate or plastic tray covered with wax paper also will work). (The old food, waste and stringy silk material can be removed but does not have to be, to help keep your worms clean you can occasionally put clean mesh down on top of the worms and feed by placing food on top of mesh, worms will crawl up through mesh to feed and you can lift worms up with mesh to lift up off of the old waste and silk.) Continue feeding using strips of chow. After each feeding, place a lid with holes punched in it loosely over the container (place lid askew and punch plenty of holes in the lid to allow worms to breath) for several hours (8 to 24 hours) while the worms feed (this should keep the chow from drying out prematurely while the worms feed). If raising in a tray or container with no lid or if chow is drying out too quickly you can place a large sheet of wax paper over the top of the worms to keep them and the chow moist while they feed. Continue feeding every day (or every other day) depending on how fast they eat. NOTE: It is IMPORTANT to make sure the old chow from the previous feeding has thoroughly dried before each new feeding. To dry out the old chow, you will need to remove the container lid for several hours (as many hours as it takes). As the worms grow larger (over 1 inch long) they sometimes eat the chow so quickly that a lid may not be required at all.
5) CLEANING: Many customers have reported that the more the worms are handled and their containers cleaned, the more they experience a die-off. It is not necessary to clean the worms containers (until they get large) AS LONG AS the old Chow is allowed to dry-out thoroughly before each new feeding. Old damp chow is a breeding ground for mold and other problems, dry chow is not. To help keep your worms clean you can occasionally put mesh down on top of the worms and feed by placing food on top of mesh, worms will crawl up through mesh to feed and you can lift worms up with mesh to lift up off of the old waste and silk. (Mesh may be found at Lowe's or similar type store sold in rolls as plastic gutter guard.)
6) Continue to feed until the worms reach the desired size. (We recommend feeding them to your animals before they reach full size because they tend to become more fragile and die easier as they approach full size.) Under ideal conditions (78 to 85 degrees and allowed to feed nearly continuously) they can reach 1 inch in length in about 12 days, and 3 inches in under 30 days. The worms can begin to spin cocoons at 28 days old when they are between 2 1/2 and 3 inches long (usually takes 2 to 3 days to complete cocoon). The moths usually emerge in 2 to 3 weeks and they do not eat or fly. They will usually mate and lay eggs and die within a week. Fertile eggs turn from yellow to gray in a week or so, and if they don't hatch within 3 weeks, they usually will not hatch until the following year.
MOLD: Mold develops from high temperatures and high humidity. If the worms are covered too long, mold can develop and may kill the worms. If mold develops, grate about 1/2 inch of chow all over the worms with a cheese grater. Several hours later, as the worms crawl to the top of the new chow pile you can peel and lift them off the moldy chow and place them into a new container. You can remove worms from mold underneath by putting mesh down on top of the worms and feed by placing food on top of mesh, worms will crawl up through mesh to feed and you can lift worms up with mesh to lift up off of the old waste and silk. (Mesh may be found at Lowe's or similar type store sold in rolls as plastic gutter guard.)
NOTE: If you plan on using mulberry leaves to feed your silkworms, remember that when they first hatch their jaws are so tiny and weak that they can only eat the smallest (1/2 to 1 inch long) new tender growth mulberry leaves. When they hatch, place one or two mulberry leaves into the petri dish until they are completely consumed (and repeat at least twice per day). Remember they do not easily convert to eating Silkworm Chow once they taste fresh mulberry leaves. Please let us know if you are not successful hatching and raising your worms...we may be able to help you figure out what went wrong.
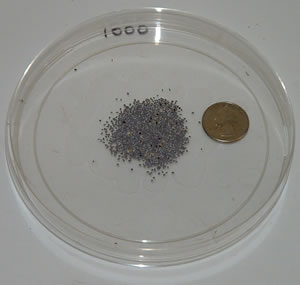
1000 silkworm eggs next to a quarter for size reference.
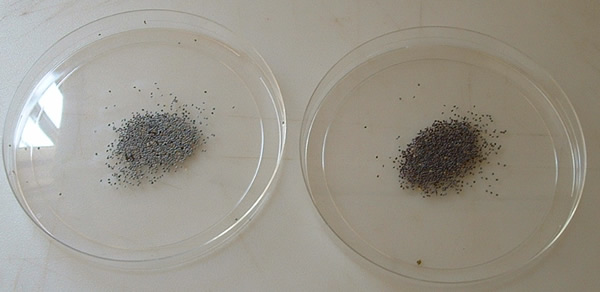
Here is a picture of 1000 silkworm eggs that are ready to hatch (left petri dish), and another petri dish with 1000 eggs that are about 1 week away from hatching (right petri dish). Notice the darker purplish color of the eggs that are a week away from hatching compared to the lighter bluish eggs that are within a day of hatching. Eggs always turn this light bluish color a few days before they hatch.
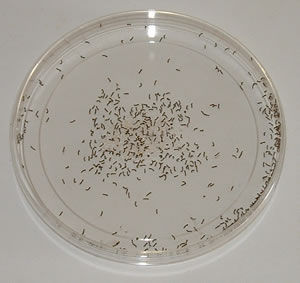
Picture of eggs after tiny silkworms have hatched (must be fed within 24 hours after hatching)
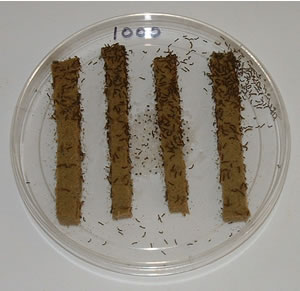
Recommended way to slice and place chow into large petri dish after worms have hatched (keep lid on petri dish and keep warm; 78 - 85 degrees). Our picture shows 1000 eggs that just hatched, but we recommend no more than 500 eggs per large petri dish to get the maximum number of silkworms from the eggs (otherwise overcrowding can cause a higher percentage of losses)
PROPER HEATING METHOD--PETRI DISH (CONTAINING SMALL SILKWORMS)
INFO BELOW APPLIES ONLY TO NEWLY HATCHED (AND SMALL SILKWORMS under 3/4 inch) IN PETRI DISH.
IMPORTANT: Excessive condensation, and cool temperatures (under 75 degrees) are the leading causes of failure when the silkworms are under 3/4 inch long. The best way to avoid excessive condensation in the petri dish is by using an incubator (especially when the worms are small). EXCESSIVE CONDENSATION is defined as drops of water forming on inside of petri dish lid and dripping on worms.
NOTE: If the worms are 3/4 inch long or larger, then condensation and temperature will not have as much effect on them.
WHY WE RECOMMEND USING AN INCUBATOR FOR SMALL SILKWORMS IN PETRI DISH CONTAINING CHOW
The reason an incubator works so well is because it warms the air around the petri dish, and not just the petri dish. When the air is warmed around the petri dish, only a light fog or mist will form inside the petri dish (which is okay), but if you heat the petri dish "directly" by setting the petri dish on a heating pad (or using a light bulb) to heat, oftentimes, excessive condensation will form on the inside of petri dish lid and will drip down and can drown the small silkworms under 3/4 inch. Also when excessive condensation forms in the petri dish - it causes the chow to dry out prematurely due to the water evaporating out of the chow (making it dry and difficult for the worms to feed on). An incubator can make the difference between success and failure.
Incubator with thermostat (above), see link below to order
Nothing works as well as an incubator because it has a thermostat. However, a warm room or heated closet (where temperature does not fluctuate) will also work. However, if you have to use an alternate heat source, such as a heating pad, it will not work as well as an incubator because it is difficult to regulate the correct temperature without a thermostat. If you have no alternative - make sure you do not set petri dish directly on (or too close to) a heating pad. Instead use a large box (preferably plastic) and place heating pad under the box and place the petri dish in the box, we recommend you place the petri dish on an object such as a cup (see picture below), and place it inside the box so the petri dish is suspended several inches above the floor of the box (keep lid on box). Even so, the temperature may be too hot in the day (depending on your room temperature) and you may need to partially remove lid.
If you choose to use a light bulb (or a ceramic heat bulb) to heat the petri dish we recommend a 40 to 60 watt bulb. From our experience, we found if you use a plastic box approx. 24 inches long, by approx. 16 inches wide, and 12+ inches tall (available at Walmart), and place a 60 watt light bulb inside, it will keep the temperature inside the box around 80 to 85 degrees (when room temp is 65 to 70 degrees), if you leave the lid on the plastic box.
IMPORTANT: Make sure that you place the light bulb to the farthest corner away from the petri dish so the light will not shine directly on the petri dish or you will likely get a condensation problem (you also may want to make a partition out of cardboard to shield the petri dish from the light). Light rays entering the petri dish will cause extra heat to enter and will usually cause excessive condensation.
NOTE: Ceramic bulbs (see picture below) do not give off light and do not need a partition.
Also, it is advisable to place the petri dish on a cup (see picture below with petri dish on purple cup). Notice it is up off the bottom of the box - as it will be warmer higher up.
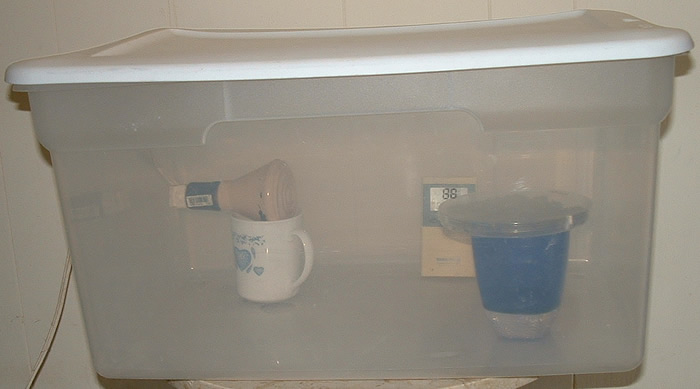
Notice this setup of plastic container with 60 watt ceramic heat bulb (tan), sitting on a tea cup - with petri dish suspended off floor of box (on top of purple cup).
NOTE: an incubator works MUCH better than this makeshift setup because it has a thermostat and can regulate and maintain correct temperatures. Unfortunately using this system (above) has some drawbacks... it may be too hot during the day, and not warm enough at night (depending on room temperature) so you will want to keep a close eye on your thermometer to maintain correct temperature.
CAUTION: Be careful because light bulbs (and ceramic heat bulbs) get VERY hot and can melt plastic and cause a fire.
Below see a picture of an inexpensive incubator (approx. $50.00). We recommend Hova-Bator model #1602N because it has an adjustable thermostat and does not have a fan. We do not recommend an incubator with a fan because it will circulate the air and will cause the silkworm food inside the petri dish to dry-out too quickly and the worms will not be able to feed. Note that the incubuator used must have an adjustable thermostat (those made for poultry generally do not).
Hova-Bator Incubator
Invented by G.Q.F. Manufacturing Co. over 30 years ago, the Hova-Bator is still the WORLD'S BEST SMALL INCUBATOR and the THERMAL AIR FLOW MODEL, is the most economical, reliable incubator available. The radiant heat tube gently warms the inside of the incubator, the air and eggs. Thermal action of the heated air flowing out the exhaust vents in the top of the incubator, draws fresh air in through the bottom vent. Dimensions 18 x 18 x 7 1/2, 110 Volt AC. 25 Watt Heat Element. This incubator has an adjustable wafer thermostat and it can be used for reptile eggs, bird eggs and of course hatching and raising silkworms.
Sorry, we are no longer are selling incubators, but you can "Google" them online.
The model we recommend is #1602N (or equivalent).
SMALL AND MEDIUM SILKWORM CARE SHEET (WORMS WITHOUT FOOD IN CUP)
Upon Arrival (Ambient Air temps should be kept around 75-85 where raising silkworms):
1) Open dish silkworms arrived in and place worms into a shoe box or sweater box size container (preferably plastic).
2) Prepare Silkworm Chow and grate a small amount of chow (approx. 1/4 inch) on top of all the worms using a cheese grater (or use fresh mulberry leaves if you prefer).
3) After each feeding, place a lid with holes punched in it loosely over the container (place lid askew and punch plenty of holes in the lid to allow worms to breath) for several hours (at least 8 hours) while the worms feed (this should keep the chow from drying out prematurely while the worms feed). If raising in a tray or container with no lid or if chow is drying out too quickly you can place a large sheet of wax paper over the top of the worms to keep them and the chow moist while they feed.
4) Feed chow in strips or chunks as the worms grow larger.
5) Feed everyday until worms reach the desired size.
6) To help keep your worms clean you can occasionally put mesh down on top of the worms and feed by placing food on top of mesh, worms will crawl up through mesh to feed and you can lift worms up with mesh to lift up off of the old waste and silk. This also works if you notice that mold has formed on old food, you can bring the worms up off the old food and save them this way. (Mesh may be found at Lowe's or similar type store sold in rolls as plastic gutter guard.)
NOTE: During mulberry season we often package silkworm shipments with fresh mulberry leaves because it makes a great packing material as well as providing food during shipping. However, sometimes when silkworms have been feeding on mulberry leaves they are a bit reluctant to eat Silkworm Chow until they get very hungry. To get them to feed on the chow you may need to separate them from all traces of mulberry leaves (and stems) before offering them chow.
GOLIATH HORNWORM CARE SHEET
When your Goliath hornworms arrive (leave the lid on) and orient the cup so the food is at the top and the lid is facing down on a table. (Be sure and prop up edge of lid about 1/4 inch so air can flow between the table and the lid or the cups cannot breathe properly.) The worms will grip the mesh and feed upward towards the food and their waste will fall down (on the lid).
The worms can remain in the cup until they run out of food (or outgrow it). As the worms grow larger, you will need to discard their frass (waste) by gently opening the lid and allowing the frass to drop into the trash.
Try to keep the temperature between 80-85 degrees if you want them to grow very quickly. (Temperatures above 90 degrees can be fatal.) Once they reach about an inch long, they grow astonishingly fast. They can grow from 1 inch, to between 3 and 4 inches in 4 to 7 days (if kept very warm).
HOW TO SLOW HORNWORM GROWTH
Goliath Hornworms worms grow so quickly sometimes they grow too big, too fast for some customers' animals to eat. When Goliath Hornworms reach the size desired, you can slow growth dramatically and extend shelf life considerably (by a couple weeks) if you store them between 55 and 65 degrees.
DO NOT REFRIGERATE hornworms because most refrigerators are between 35 and 40 degrees (too cold) which will kill them. If you don't have a "cool room" or a wine cooler, the easiest way to extend their shelf life is to place the worm cup in an ice chest with refreezable ice packs (making sure the ice pack is not touching the hornworm cup!) and exchange the ice packs with fresh ones as needed to keep cool.
There is enough food in each cup to raise several hornworms to full size. If however you run short on food, they may become cannibalistic. Larger hornworms can eat ripe tomato, sliced potato or bell pepper, or you can purchase additional green Silkworm/Hornworm Chow or yellow Hornworm food from Mulberry Farms at www.MulberryFarms.com.
CAUTION: DO NOT FEED TOMATO OR TOBACCO LEAVES TO HORNWORMS BECAUSE THEY ARE TOXIC TO REPTILES!!!
Also, like superworms, hornworms are able to bite. (Some pet owners choose to remove their jaws with fingernail clippers before feeding the larger worms to their animals.)
MOLD: If your cups develop mold in them, simply take a spoon and remove it. The main cause of mold forming in the cups is from too much humidity, and from the worm's frass coming into contact (and sticking) to the food. Also remove any worms if they die.
In 2-3 weeks from the time they hatch (when they are between 3 and 4 inches long) the hornworms will stop eating (and let go of the mesh in the cup) and drop to the bottom of the cup. If you look carefully you will notice their color will fade and they will have developed a brownish purple color down the length of their back where their pulsating heartbeat is visible. At this point they stop eating and become restless and begin looking for a place to bury themselves (to pupate). They now are ready to change into a pupa and eventually a moth. At this stage they will either pupate or die - so you better hurry and feed them to your hungry Herps!
If you want the hornworms to pupate, place them in a cup containing damp peat-moss or dirt and they will dig down about 4 inches deep and then they will usually pupate within about 2 weeks. The moths can emerge between 2 weeks and several months later.
CAUTION: Do not release the worms, pupa or moths into the wild because hornworms are considered pests and can damage crops.
HATCHING GOLIATH HORNWORM EGGS
Goliath hornworm eggs are not stored or raised like silkworms eggs. Several methods work for hatching fresh hornworm eggs and feeding newly hatched hornworms. The two methods we have found that work best are (1) hatch hornworm eggs in petri dish and "flick" into the cup when hatched; (2) place hornworm eggs on lid and hatch out on lid with cup in proper lid down position (they will crawl up mesh to eat the food). You can experiment and use whichever method works best for you, or you may find another method that works better for your use. As with silkworm eggs, hornworm eggs should not be hatched directly on the food as this will cause poor hatch rate, death among the eggs, and possibly mold. Ideal temps for hatching hornworm eggs are 80-85 degrees.
How Much Food Will My Hornworms Eat? It takes about 1 oz of prepared food per hornworm to reach full size (approx. 3/4 lb of prepared hornworm chow for 10-12 hornworms).
Featured Products